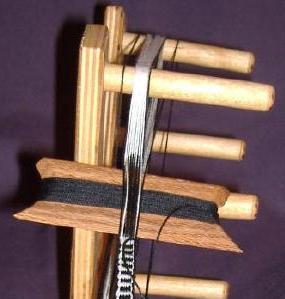
Warping Guide for Palmers Mini Inkle Loom
Home Page 2 Page 3 Page 4 Page 5
Fill your shuttle with the dark thread, start with the end
of your thread
through the
hole in the shuttle. Wrap a
good amount of thread on the
shuttle, the amount will
vary with the size of thread used. You can always
add
more if needed.
To change your shed reach with your left hand behind
the front arm and either
lift
or push down on the even
numbered threads. In the pictures above you
can see
the two different positions for the shed. On the left is
the shed
above the odd
numbered threads and the
right shows the shed below the odd
numbered threads.
Before you start to weave you will need to check
your
tension. The easiest
way is
to change your
shed, if
you
get a clean color change your tension
is
good.
Your
outside edges should remain dark
with the middle
threads
going
from all light to a
column of light with
dark centers.
Your tension
should
be good at this point,
if not
you can
re-adjust by loosening the nut and moving
the
tension peg
towards the
front of the loom.
(For the classroom model
just move your tension
peg to the first hole.)
Start by lifting the even threads with your left hand,
going point first insert
your
shuttle into the shed
with your right hand, once your shuttle is in the
shed
you
can remove your left hand, and slide the shuttle
down towards the front
peg.
Do not go beyond the
frame of the loom with your shuttle. Now
pull your
shuttle
through leaving a 3 inch tail of thread on the
right hand side
of the loom.
Next, push down on the even threads with your right
hand and going point first
insert your shuttle once
again into the shed with your left hand, once your
shuttle
is in the shed you can remove your right hand,
and slide the shuttle
down towards
the front peg until
it meets the previous stitch.
Leave your
shuttle in
place at this time.
Without removing the shuttle keep the shed open
and pass the tail you left on
the
previous stitch
back through the shed.
Pull your shuttle through. Grasp the loose thread and
the
thread on the
shuttle and
pull gently in opposite
directions,
until all your center threads
are showing
your light
color.
This secures your tail and it can now
be
trimmed off,
leaving about 1/2 inch.
Your next stitch will be right to left. Lift the shed with
your left hand
and insert your
shuttle point first through
the shed. Slide the shuttle
down to meet your previous
stitch making a straight bar. This is where you
will beat
down on the weaving to
tighten and straighten your
previous stitches,
you will do this with each shuttle throw.
Your next stitch will be left to right. Push down the shed
with your right
hand and
insert your shuttle point first
through the shed. Slide the
shuttle down to meet your
previous stitch making a straight bar. This is
where you
will beat down on the
weaving to tighten and straighten
your previous
stitches, you will do this with each
shuttle
throw.

Repeat these two steps alternating right and left,
until you reach a
point where
you
can no longer make a
shed for the shuttle to fit through.